Preventing Rear-End Collisions - Get your Gaprite!
This research topic was my son's project at the Intel International Science and Engineering Fair (Intel ISEF) in 2010.
Rear-end collisions are major kind of car accident through the world, costing car owners and insurance companies, many billions of dollars in repairs. They also cause many deaths and injuries.
In most situations, the origin of these crashes is due to the following vehicle travelling too close to the car in front and being unable to stop in time if he car ahead stops suddenly. This is often called 'tailgating'.
Most drivers don't really understand the size of the safe gap distance and how this changes with speed. Many drivers have no way of setting these gaps.
Tail-gating accounts for about 30% of all freeway accidents.
In a rear-end collision the following driver is mostly deemed to have caused the accident because it is their responsibility to leave an adequate gap to the car in front. This applies to 'pile-ups' where several cars may crash into each other, triggered by the last car in the line.
Advanced Electronic Devices
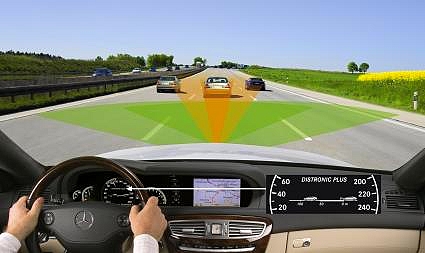
A recent British study reviewed the effectiveness of modern advanced electronic devices for maintaining safe following distances using radar. The Mercedes Distronic Plus, Honda CMBS and Volvo City Safety Car, have radar devices to detect when a following vehicle is too close to the car in front to prevent a collision. Some systems automatically apply the brakes to eliminate any risk of a rear end collision. The image below illustrates how these devices work.
However, electronic systems are complex, very expensive and are very hard to retro fit to older models of cars. Therefore these advances electrinic systems are unlikely to be a widespread solution for most of the older cars on the road.
Existing Manual Methods for Setting the Gap - The 2 and 3 Second Rules
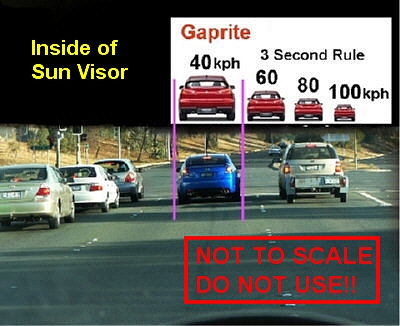
Most Motoring authorities around the world suggest setting safe following distance gaps using what is called the 2 or 3 second rules. The concept is that you should leave a gap equivalent to the total distance a car travels in 2 or 3 seconds. This corresponds to the stopping distance and will obviously vary with the speed the car is travelling (see the Appendix). Increased gaps equivalent to 6 to 9 seconds are recommended for wet and icy conditions.
The suggested way of setting these gaps when driving is called the 'Landmark Method'.
The Landmark Method for setting a 2 or 3 second gap to the car in front

However, regardless of their prevalent, these ways of setting 2 and 3 second gaps are problematic.
- Landmarks such as trees, lighting or power poles, roadway signs may not be available, especially on multi-lane freeways.
- Drivers have to look to the side of the road several times to make the adjustments.
- Mentally counting seconds may be inaccurate and distracting.
Clearly most drivers do not know about these methods or cannot use them effectively, as research has shown that most drivers only leave a 1 second gap.
A better method is needed
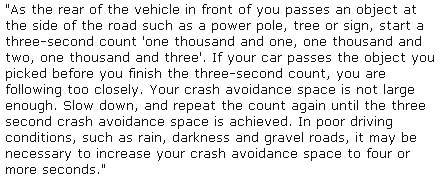
Gaprite stickers were designed using perspective images placed in the driver’s view. The images match the size a car travelling in front, would appear at the correct gap distance for the speed.
The design concept was based on perspective images. As an object gets further away it appears to shrink in size. The image of a car was re-sized so that its width, when placed on the inside of a sun visor, would match that of a car ahead, at the 2 or 3 second gap distance for the speed.
Stickers for both the 2 and 3 second rules (shown below) were designed to be attached to the inside of the sun visor or to the top of the windscreen. The way the device is used is shown in the image below. The matching stopping distances for the speed are shown in the Appendix.
Most people are very surprised when they see the distances required (see the Appendix).
Preliminary trials showed that the stickers were easy to use and non-distracting as the driver always looks ahead when setting the gap.
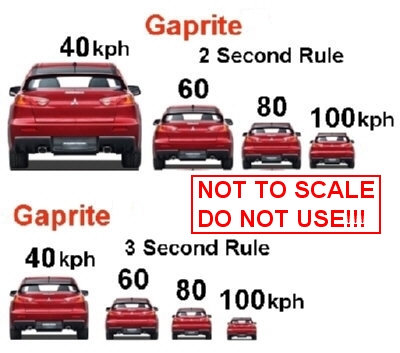
To use the device, the driver selects the image for the speed the car is travelling and slows down or speeds up until the apparent width of the car ahead, matches the width on the image.
The Gaprite method is practical, simple and non-distracting as the driver looks ahead when setting the gap.
The method is a great way to learn about the size of the safe gaps and how they change with travelling speed.
Further research is required to test its effectiveness. It could be developed as a 'heads-up' display device.
NOTE: The stickers are designed for training and research purposes only, and should not be used when driving.
Appendix: Summaries of the safe stopping distances at very speeds are shown below: